AWAREFramework-iOS is a library version of AWARE iOS. The library allows us to easily implement functions (e.g., background sensing, database synchronization, and ESM) which are used on AWARE iOS, into your standalone application. This tutorial shows how to create a standalone iOS application with AWAREFramework-iOS. The library can be installed via CocoaPods to your Xcode project and easily extend/adjust to your project.
- Creating a new iOS application project using Xcode
- Adding AWAREFramework-iOS to your project via CocoaPod
- Editing properties of the project for allowing background activity sensing
- Using the library on your project
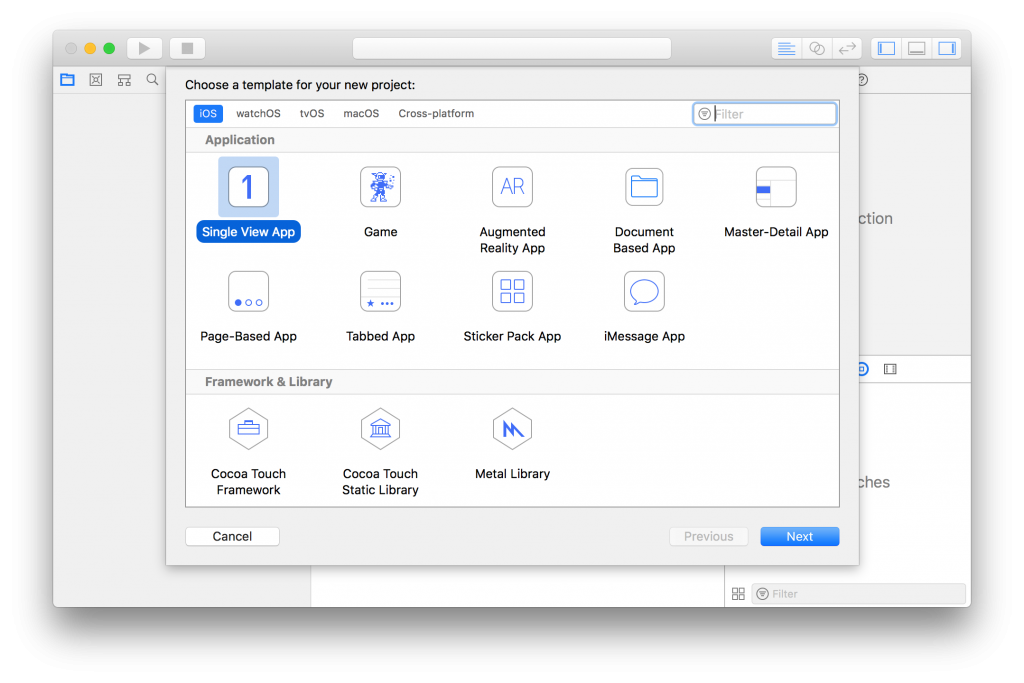
1. Creating a new iOS application project using Xcode
Open Xcode and select Menu -> File -> Project... -> Application for creating a new project.
2. Adding AWAREFramework-iOS to your project via CocoaPod
AWAREFramework-iOS can be installed via CocoaPod which is a well-known library manager for Xcode. If CocoaPod is not ready on your PC, please install it on your computer via their website (link).
For installing the library vai CocoaPod, please move to the created project using Terminal or related software. At the directory, run the following command to set CocoaPod into your project.
> pod init
After running the command, Podfile and project_name.xcworkspace are generated into your project.
The Podfile manages libraries for your project. For installing the library to your project, you need to add library information to the file using Text Editor.
platform :ios, '10.0'
pod 'AWAREFramework', :git=>'https://github.com/tetujin/AWAREFramework-iOS.git'
After Podfile is ready, you should run the following command to installing the library.
> pod update
After the pod update command, please open project_name.xcworkspace. (NOTE: not project_name.xcodeproj)
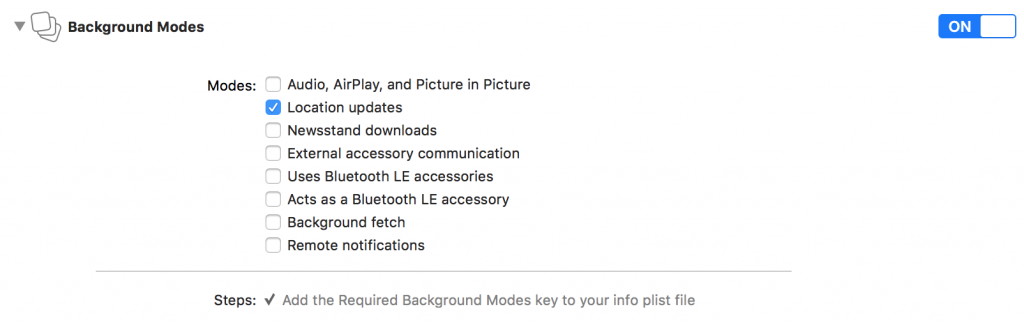
3. Editing properties of the project for allowing background activity sensing
If you need background activity sensing, you need to edit Background Mode and Info.plist. As a minimum setting for background activity sensing, you have to change following two settings (Capabilities/Background Modes and Info.plist) as follows:
- Capabilities/Background Modes
- Location updates
- Info.plist
- Privacy – Location Always and When In Use Usage Description
- Privacy – Location Always Usage Description

NOTE: the following permissions are minimum requirements for background activity sensing. Please change this setting based on your required sensors.
4. Using the library on your project
Open project_name.xcworkspace and move to AppDelegate.m . (If the project is based on Swift, please move to AppDelegate.swift )
First of all, please activate AWARECore, and also, if you need to collect sensor data in the background, please request a permission for background sensing.
Objective-C
AWARECore * core = [AWARECore sharedCore];
[core activate];
// OPTION: please request the following permission if you need to collect sensor data in the background.
[core requestPermissionForBackgroundSensing];
Swift
let core = AWARECore.shared()
core.activate()
// OPTION: please request the following permission if you need to collect sensor data in the background.
core.requestPermissionForBackgroundSensing()
[Example 1] Initialize sensors and save sensor data to the local database
Just the following code, your application can collect sensor data in the background. The data is saved in a local storage.
/// Example1 (Objective-C): Accelerometer ///
Accelerometer * accelerometer = [[Accelerometer alloc] init];
[accelerometer setSensorEventHandler:^(AWARESensor *sensor, NSDictionary *data) {
    NSLog(@"%@",data.debugDescription);
}];
[accelerometer startSensor];
/// Example1  (Swift): Accelerometer ///
let accelerometer = Accelerometer()
accelerometer.setSensorEventHandler { (sensor, data) in
    print(data)
}
accelerometer.startSensor()
[Example 2] Sync local-database and AWARE Server
AWARECore, AWAREStudy, and AWARESensorManager are singleton instances for managing sensing/synchronization schedule in the library. You can access the instances via AWAREDelegate. The AWAREDelegate is described in the Installation section.
AWARECore  * core  = [AWARECore sharedCore];
AWAREStudy * study = [AWAREStudy sharedStudy];
AWARESensorManager * manager = [AWARESensorManager sharedSensorManager];
let core = AWARECore.shared()
let study = AWAREStudy.shared()
let manager = AWARESensorManager.shared()
AWAREFramework-iOS allows us to synchronize your application and AWARE server by adding a server URL to AWAREStudy. About AWARE server, please check our website.
/// Example2 (Objective-C): Accelerometer + AWARE Server ///
[study setStudyURL:@"https://api.awareframework.com/index.php/webservice/index/STUDY_ID/PASS"];
Accelerometer * accelerometer = [[Accelerometer alloc] initWithStudy:study];
[accelerometer startSensor];

[accelerometer startSyncDB];
// or
[manager addSensor:accelerometer];
/// Example2 (Swift): Accelerometer + AWARE Server ///
study?.setStudyURL("https://api.awareframework.com/index.php/webservice/index/STUDY_ID/PASS")
let accelerometer = Accelerometer(awareStudy: study)
accelerometer.startSensor()
accelerometer.startSyncDB()
// or
manager?.add(accelerometer)
[Example 3] Apply settings on AWARE Dashboard
Moreover, this library allows us to apply the settings on AWARE Dashboard by using -joinStuyWithURL:completion method.
/// Example3 (Objective-C): AWARE Dashboard ////
NSString * url = @"https://api.awareframework.com/index.php/webservice/index/STUDY_ID/PASS";
[study joinStudyWithURL:url completion:^(NSArray *settings, AwareStudyState state, NSError * _Nullable error) {
    [manager addSensorsWithStudy:study];
    [manager startAllSensors];
}];
/// Example3 (Swift): AWARE Dashboard ////
let url = "https://api.awareframework.com/index.php/webservice/index/STUDY_ID/PASS"
study?.join(withURL: url, completion: { (settings, studyState, error) in
    manager?.addSensors(with: study)
    manager?.startAllSensors()
})
Experience Sampling Method (ESM)
This library supports ESM. The ESM function allows us to make surveys on your app easily. The following source code shows an example of the survey which is composed of a radio button and delivered at 9:00, 12:00, 18:00, and 21:00 every day.
/// Objective-C: Initialize an ESMSchedule ///
ESMSchedule * schedule = [[ESMSchedule alloc] init];
schedule.notificationTitle = @"notification title";
schedule.notificationBody = @"notification body";
schedule.scheduleId = @"schedule_id";
schedule.expirationThreshold = @60;
schedule.startDate = [NSDate now];
schedule.endDate = [[NSDate alloc] initWithTimeIntervalSinceNow:60*60*24*10];
schedule.fireHours = @[@9,@12,@18,@21];

/// Make an ESMItem ///
ESMItem * radio = [[ESMItem alloc] initAsRadioESMWithTrigger:@"1_radio"
radioItems:@[@"A",@"B",@"C",@"D",@"E"]];
[radio setTitle:@"ESM title"];
[radio setInstructions:@"some instructions"];

/// Add the ESMItem to ESMSchedule ///
[schedule addESMs:@[radio]];

/// Add the ESMSchedule to ESMScheduleManager ///
ESMScheduleManager * esmManager = [ESMScheduleManager sharedESMScheduleManager];
[esmManager addSchedule:schedule];
/// Swift ///
let schdule = ESMSchedule.init()
schdule.notificationTitle = "notification title"
schdule.notificationBody = "notification body"
schdule.scheduleId = "schedule_id"
schdule.expirationThreshold = 60
schdule.startDate = Date.init()
schdule.endDate = Date.init(timeIntervalSinceNow: 60*60*24*10)
schdule.fireHours = [9,12,18,21]

let radio = ESMItem.init(asRadioESMWithTrigger: "1_radio", radioItems: ["A","B","C","D","E"])
radio?.setTitle("ESM title")
radio?.setInstructions("some instructions")
schdule.addESM(radio)

let esmManager = ESMScheduleManager.shared()
// esmManager.removeAllNotifications()
// esmManager.removeAllESMHitoryFromDB()
// esmManager.removeAllSchedulesFromDB()
esmManager.add(schdule)
Please call the following chunk of code for appearing ESMScrollViewController (e.g., at -viewDidAppear: ).
/// Objective-C: check valid ESMs and show ESMScrollViewController ///
ESMScheduleManager * esmManager = [ESMScheduleManager sharedESMScheduleManager];
NSArray * schdules = [esmManager getValidSchedules];
if (schdules.count > 0) {
    /** initialize ESMScrollView */
    ESMScrollViewController * esmView  = [[ESMScrollViewController alloc] init];
    /** move to ESMScrollView */
    [self presentViewController:esmView animated:YES completion:nil];
    /** or, following code if your project using Navigation Controller */
    // [self.navigationController pushViewController:esmView animated:YES];
}
/// Swift ///
let esmManager = ESMScheduleManager.shared()
let schedules = esmManager.getValidSchedules()
if let unwrappedSchedules = schedules {
    if(unwrappedSchedules.count > 0){
        let esmViewController = ESMScrollViewController.init()
        self.present(esmViewController, animated: true) {
        }
    }
}
Supported ESM Types
This library supports 16 types of ESMs. You can see the screenshots from the link
- Text
- Radio
- Checkbox
- Likert Scale
- Quick Answer
- Scale
- DateTime
- PAM
- Numeric
- Web
- Date
- Time
- Clock
- Picture
- Audio
- Video